Arno at FS Developer has been quietly creating a program that could really change scenery design, hopefully for the better.
It's called ModelConverterX, and its purpose is to be able to convert various scenery object formats, to allow their use in modern "library object" scenery programs. While there is an X in the name, it will create FS2004 scenery MDL files too.
You can get the latest information about ModelConverterX from the support forum.
For example, if you have an old API macro object lying around (they were used with scenery programs for FS98 and FS2000), you can (sometimes) convert them to a new library object, and place it with EZ-Scenery or Instant Scenery. As an example, in the future to create static aircraft you can create an API file using M98 to BGL, convert it to a library object MDL file using ModelConverterX (MCX), and then place it into your scenery. Much easier than trying to place it directly using M98 to BGL.
But enough of that - that's not the topic of this tutorial. Arno has recently added to MCX the capability to import COLLADA (.dae) and Google Earth (.kmz) files. So what, you say? Well, there is a relatively new program called Google Sketchup that many people are using to create building models for architects, presentations, and for placement into Google Earth. With this new import capability, this means that Sketchup buildings can now be placed right into FS!
Since Sketchup is dramatically easier to use than either GMAX or FSDS, this brings up the possibility of many more people being able to add custom buildings to their airport scenery. This can only be good. :)
First, check out the first few SketchUp video tutorials here, to get an idea how easy it is to create an object. You can also download the Sketchup program. It's free - you don't need the Sketchup Pro payware program for what we are going to do. As you continue using Sketchup, keep using these tutorials to expand your abilities - they are very useful!
Basically, you draw a 2D shape, then drag it upwards to create the 3D box. Now draw sub areas on your box, and drag them outward. If you have ever used GMAX this is equivalent to the Extrude Polygons feature, but here it is quick and easy - draw the shape and drag it out.
After getting the building the shape you want you next texture it, using either custom textures you have made (like people using GMAX, etc.) or you can use some textures included in Sketchup. You must be careful, though - most of these are not in "powers of 2" (i.e. 256 x 128 pixels), which is required in FS. This conversion can be done later in ModelConverterX.
Here GMAX has an advantage over Sketchup, since the texturing process in GMAX is more flexible. Of course, you can load your Sketchup building into GMAX using the MCX .3DS export feature and texture it there if you prefer. But texturing in Sketchup isn't that bad, and since I've only spent a few hours using it there may be a much better way (wouldn't surprise me).
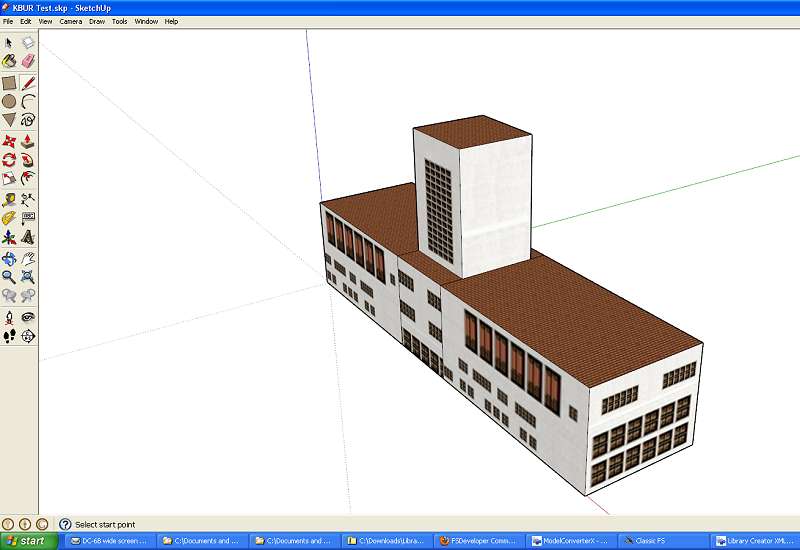
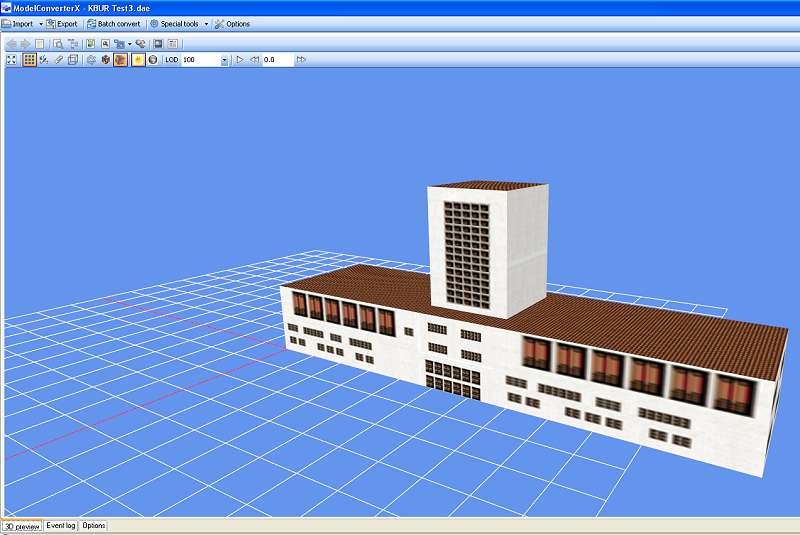
So what I have done for this tutorial is to create a simple building in Sketchup:
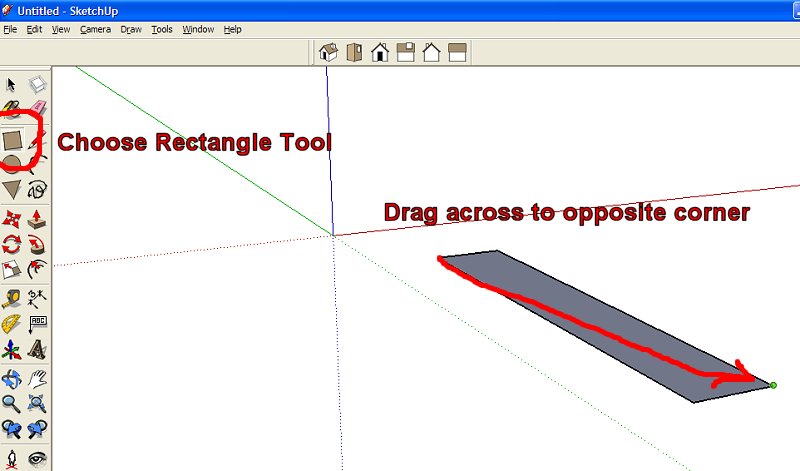
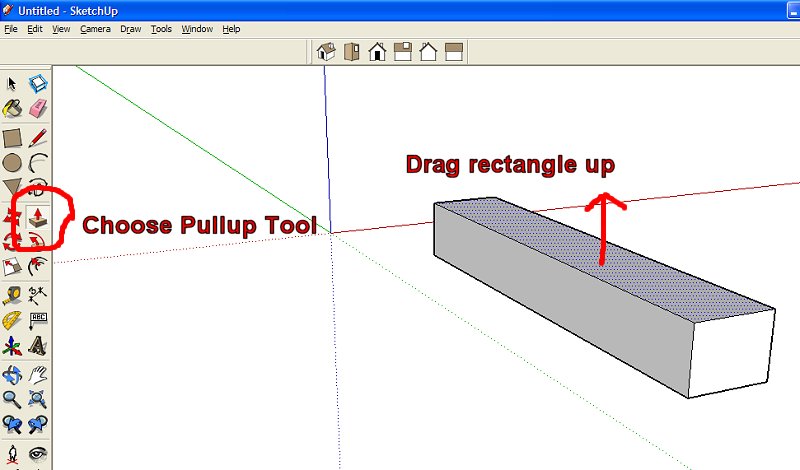
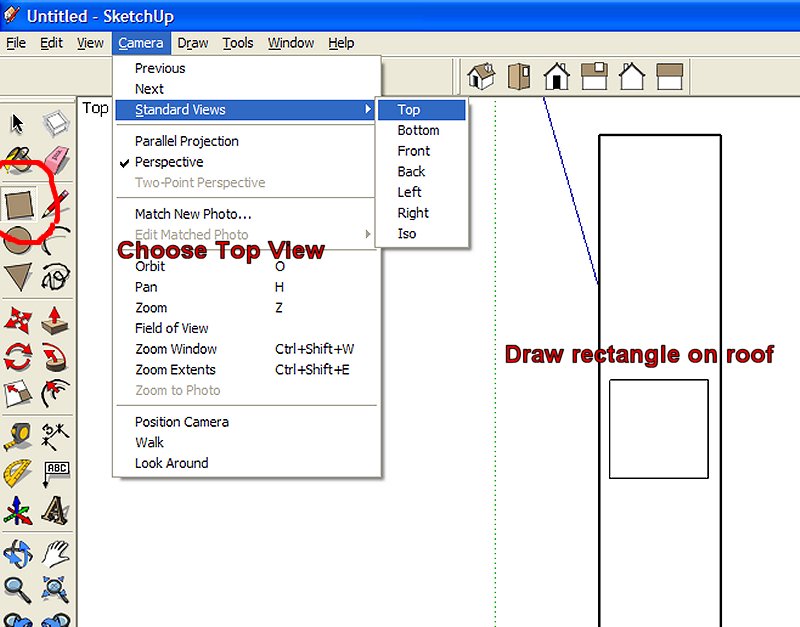
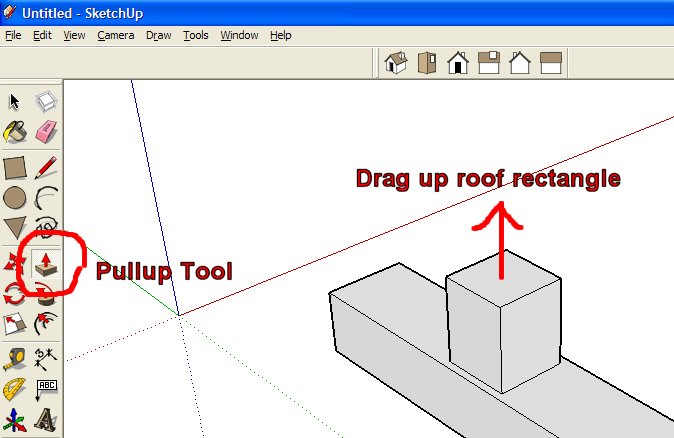
1. I first selected the Rectangle Tool (brown square) and created a rectangle on the "ground" the size and shape of my building. Immediately after drawing the rectangle, type in the size you want the base of the building to be (in this case I typed in 120',30' ENTER to make a 120 x 30 foot building). Then using the Push/Pull Tool I dragged it up to the height of the main building. Again, immediately after you pull up the rectangle, type in the height you want (in this case I typed 30' ENTER).
2. I then drew a rectangle on the roof the shape of the tower, and dragged
that part of the roof upward to create the tower. To make drawing the rectangle
easier I used Camera/Standard Views/Top to get a top view.
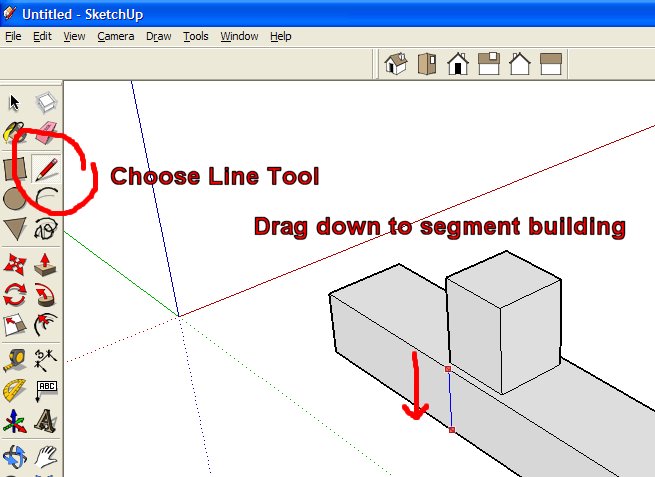
3. Next using the Line Tool I drew lines down the side of
the building to divide it into 3 sections - under the tower and to the left
and right of that.
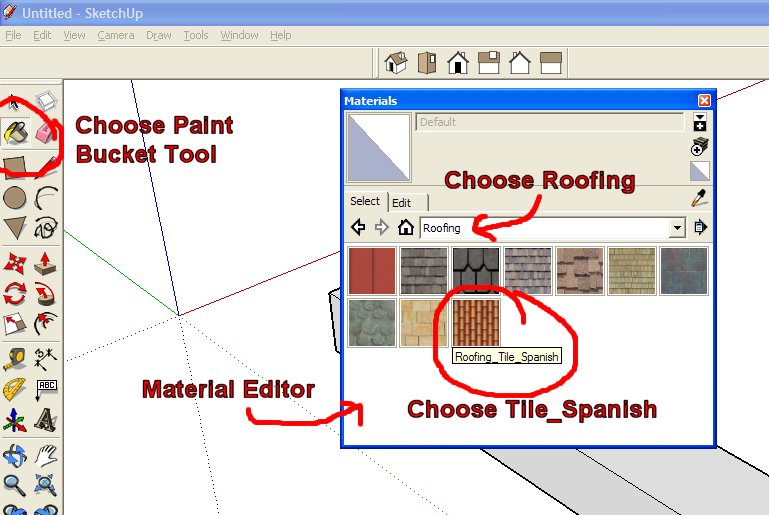
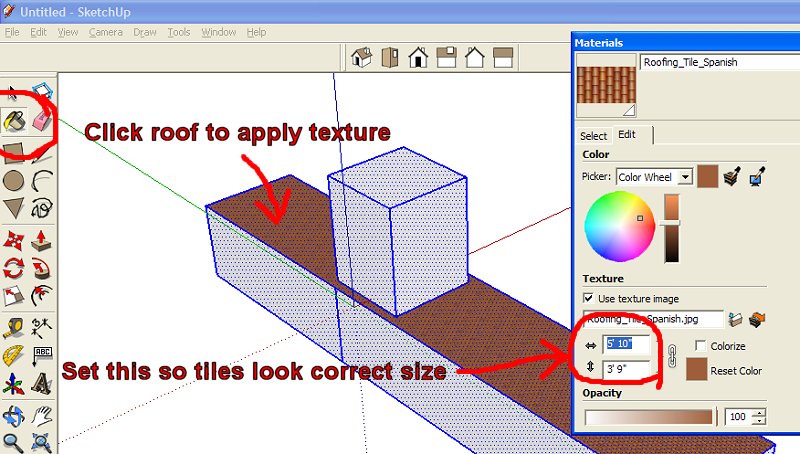
4. To demonstrate using Sketchup's built-in textures, I chose Sketchup's tile
roof texture using the Paint Bucket tool. When you select this
tool, the Material Editor will appear as a popup window. I
applied this roof texture to the roof polygons also using the Paint
Bucket tool. (With the Tile Roof material selected, just click the
roof). I adjusted the right/left/up/down lengths in the Material so the tiles
looked the right size on the roof. Do the same thing for the tower roof.
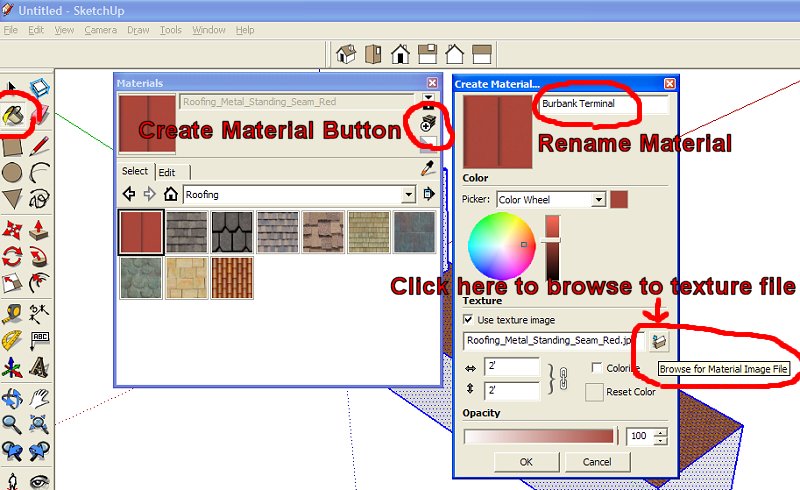
5. To demonstrate using a custom texture, I took an old texture I had sitting
around (for the the Burbank terminal, actually) and added it to the list of
Materials in Sketchup. I added it as a new Material (click the Paint Bucket
tool to bring up the Material Editor, then click the Create
Material button in the upper right of the Material Editor
with the + on it, name the material what you like (I called mine Burbank Terminal),
and then add the texture below - browse to it).
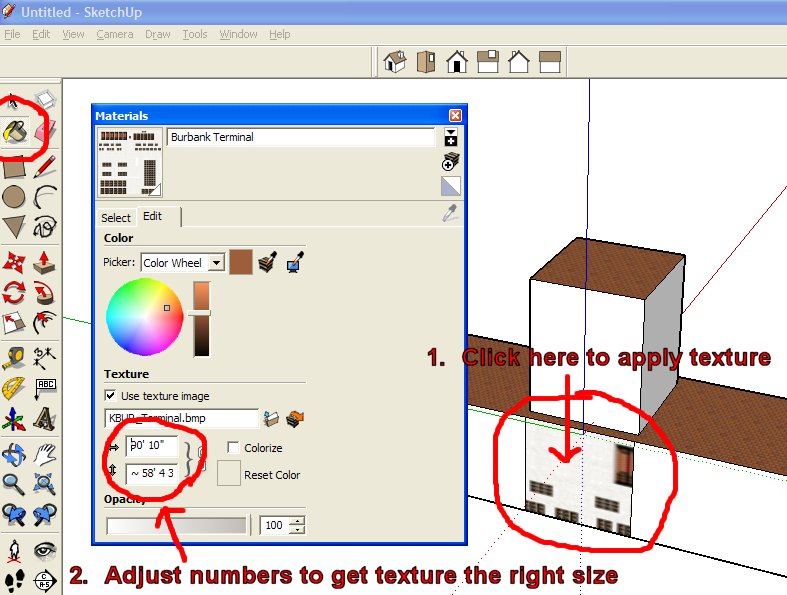
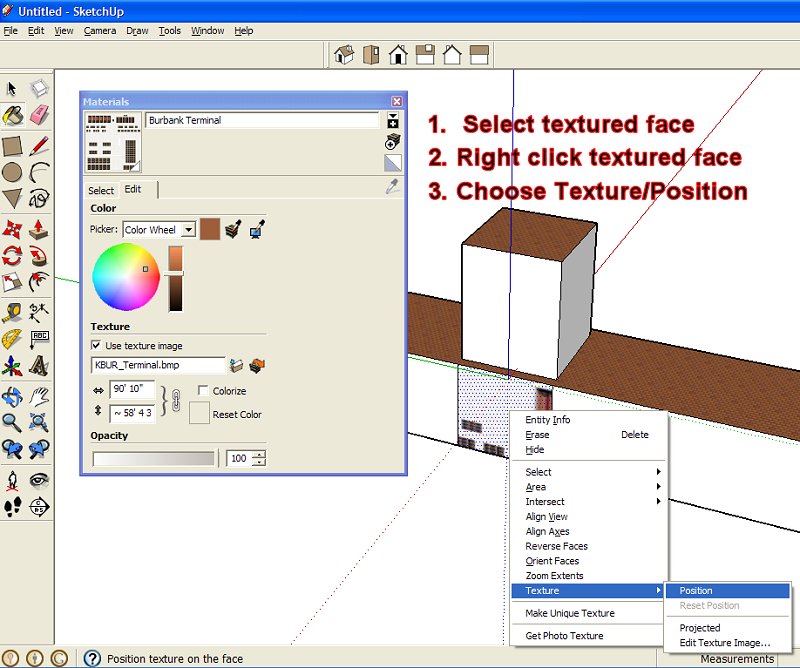
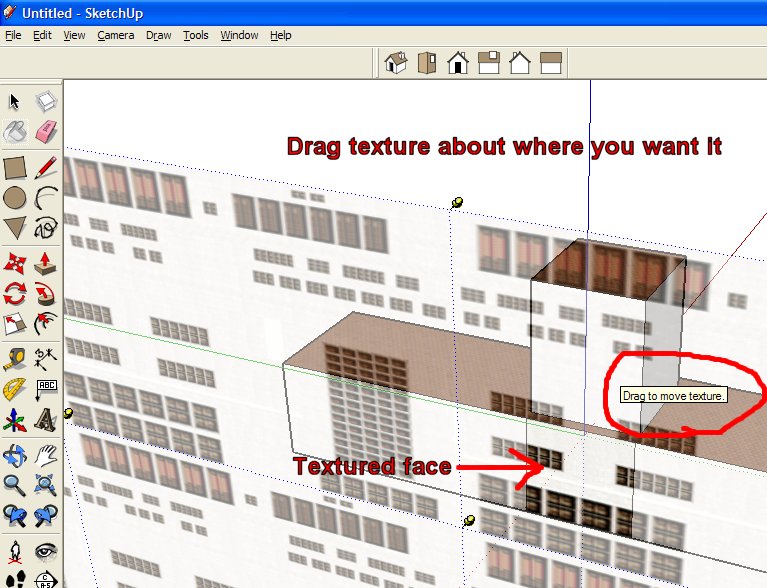
6. Now we need to adjust the "mapping" of the texture on this part
of the building (a "face") so it looks the way we want it. The "trick"
is to select a "face" (section), apply the texture using the Paint
Bucket tool, right click the face and choose Texture/Position.
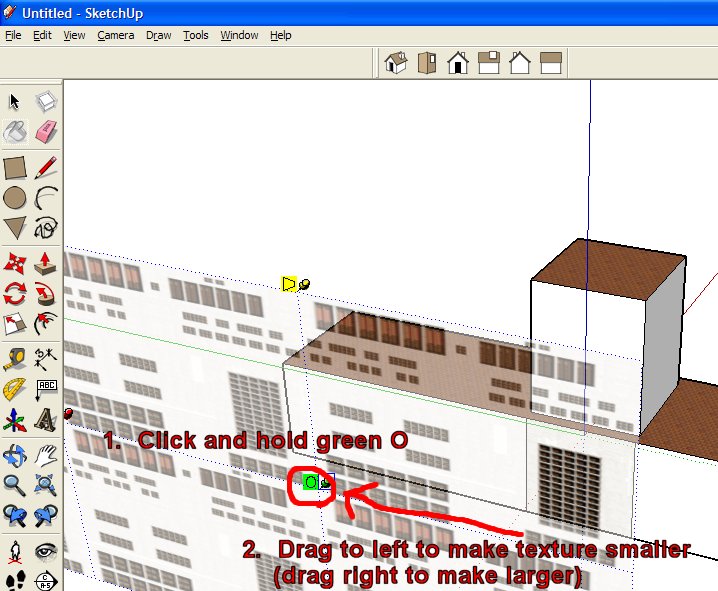
Then you drag it around until it is aligned properly. You can also use the little
green "pin" (actually the 0 right next to it) to scale and rotate
the texture on this face. For example, drag the green O to the right to "zoom
in" the texture, making it larger on the building's face. If you use the
green O to get it spanning the correct horizontal distance, you can then use
the blue box to then get it spanning the correct vertical distance.
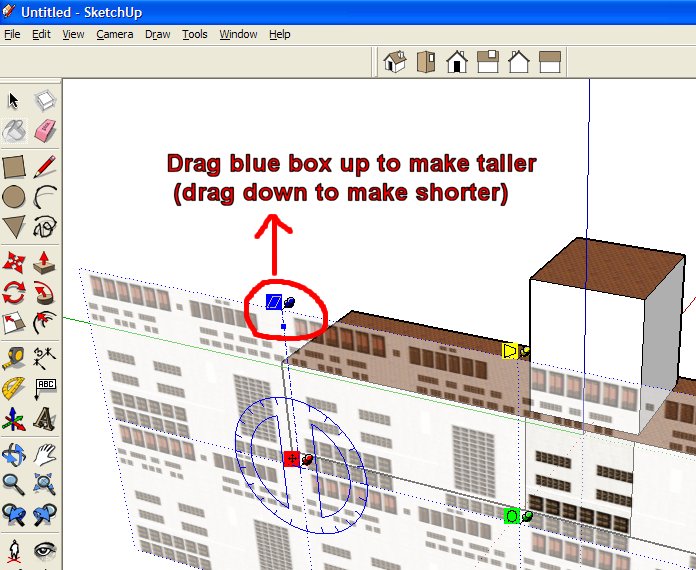
You can press ENTER to get back to the normal screen, with
your face now properly texture mapped.
7. You then repeat this process for each face. After learning how to do this, it didn't take long at all to get it looking this way:
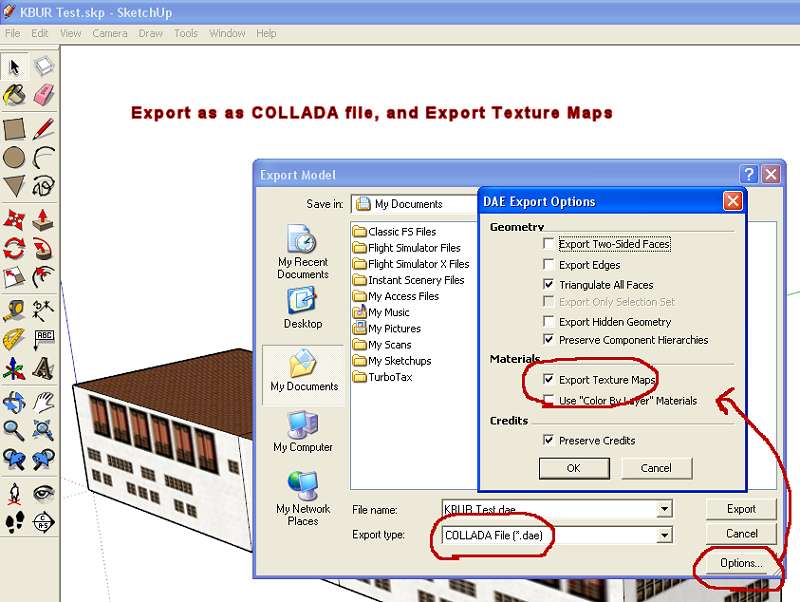
8. Now you use File/Export/3D Model and select the COLLADA format (.dae). If you push the Options button at the bottom right and check the Export Texture Maps box, your textures will be copied to a new folder with the same name as your .dae file.
9. Now we File/Save our Sketchup file for later use, and quit Sketchup.
You'll find your new COLLADA (.dae) file right where you exported it to, along with a folder of the same name containing your exported textures - using the latest versions of Sketchup 8 the texture files will have the Material names you used in Sketchup.
10. Next, you'll need to download and install theFS2004 Make Model SDK from MS. If you are creating FSX libraries, then you need to install the FSX SDK from your FSX Professional DVD's, then update to (at least) the SP1A SDK.
11. Then install and start ModelConverterX, available here (use the latest development release):
12. Now in MCX use the Import button to import your new COLLADA file (.dae). Your building should be displayed complete with textures. If one or a few textures do not show up, don't worry too much about it now.
13. Now you need to convert any texture files incompatible with FS into a compatible format. MCX can do this for you using the Material Editor, and makes it very easy. First set the default format you want the editor to suggest (you can later change this individually for each texture within the Editor, if you wish). Go to Options/Texture Settings/Default Type and then click on the current choice (DDS by default). You can select another type later, if you wish. If you are compiling for FS2004, select DXTBMP for DXT1 format. If compiling for FSX you can use the DDS choice. Make sure the path to ImageTool is correct as well (the latest version can be found in the FSX SDK). Note that the "BMP" choice will convert textures into 32 bit BMP textures, which are NOT frame rate friendly! They are very high quality, though.
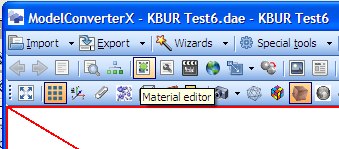
14. Click the Material Editor button in MCX
15. Select the Textures tab at the bottom left. The textures' name, size (in pixels), and format will be displayed.
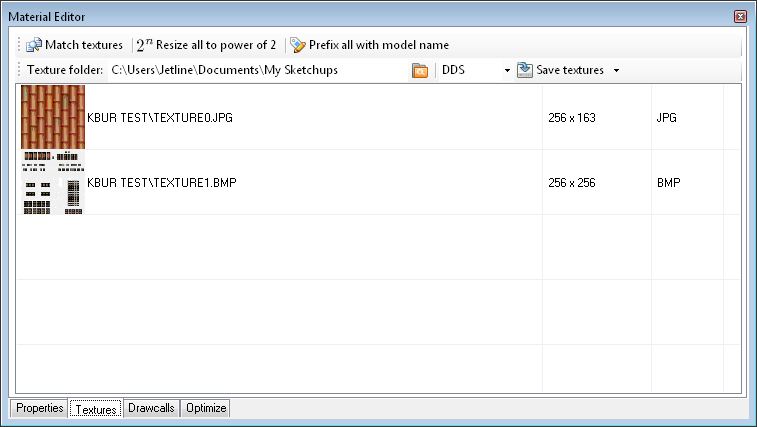
16. Note that there is a KBUR Test6\ path in front of each texture name, specifying that each of these textures is found in the folder called "KBUR Test6", created by Sketchup when it exported my file. Note that if you make any conversions, this path information is ignored. You must specify the exact location for MCX to place your converted textures in the box at the top of this window (see below). However, if you do not want MCX to make any conversions do not remove this path information - if you do it will assume you want to rename the file and will create a new version of the texture.
17. If you double click your mouse on the image, the image will be displayed
full size. I have double clicked on the Roofing_Tile_Spanish image:
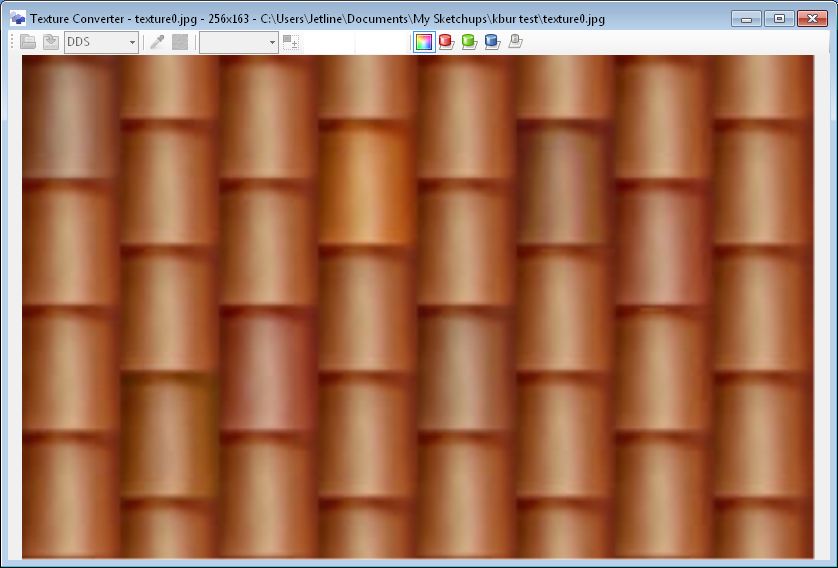
Close this window with the red X in the upper right corner. NOTE: Do NOT click the large red X on the main MCX screen instead!
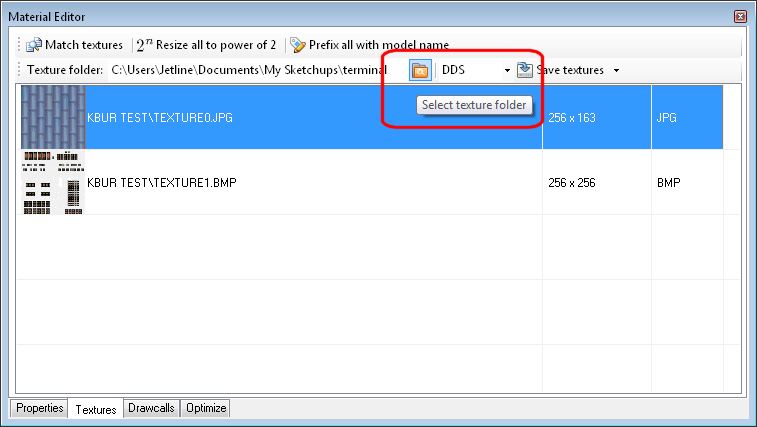
18. The first thing to do is select the folder you want your converted textures to be placed into. The default choice is the previous location you have used, but we want our converted textures placed into the folder that contains our exported textures. So in this case I click the orange folder button at the upper right of this window, and browse from the My Sketchups/terminal folder to the My Sketchups/KBUR Test6 folder (since the name of my DAE file was KBUR Test6.dae, Sketchup created a KBUR Test6 folder and placed the exported textures there). Note your folder names will be different.
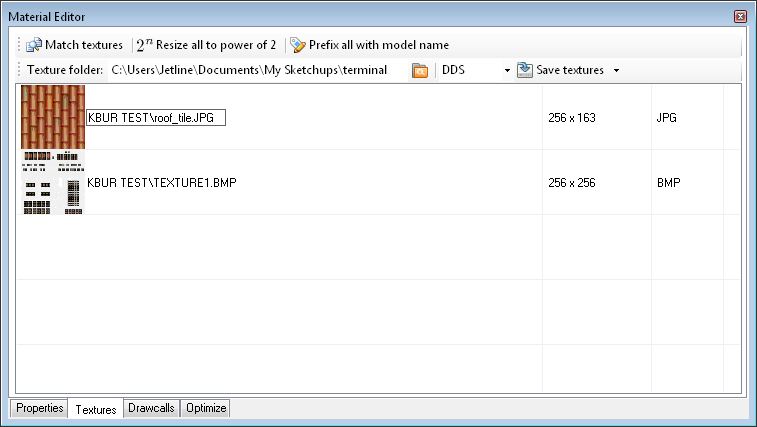
19. In our example, Roofing_Tile_Spanish.jpg is a 256 x 163 pixel JPG file. I will rename this texture to roof_tile.bmp by clicking the tile roof name, selecting the file name, then typing the new name. Renaming is your choice - you can leave names as is, if you prefer. We will do both in this tutorial. I do not want to change the name from Texture1.bmp so I will leave the name unchanged.
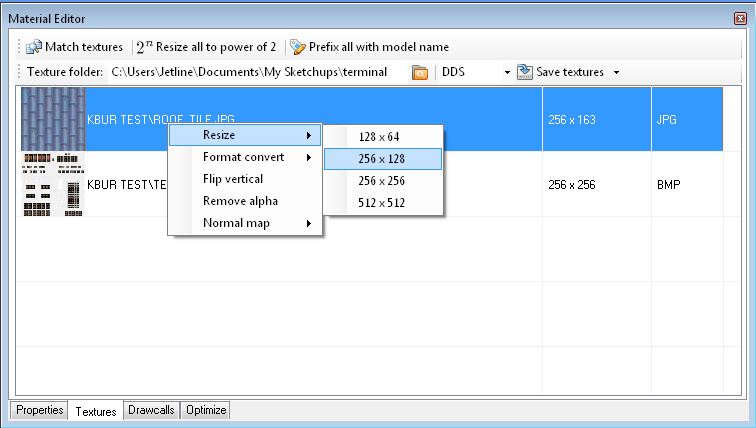
20. In this case I can see that there is a red triangle with an exclamation
point inside it at the lower left of the MCX screen. If I click the Error
Log tab there, it says that "The size of Roofing_Tile_Spanish.jpg
is not a power of 2, this is required by FS". Therefore, you need to resize
this texture to 256 x 128, the closest size to the 256 x 163 original. So, right
click on the image and choose Resize to... The other choices
are listed; all are acceptable. Since my Texture1.bmp file is already
256 x 256 pixels, I do not need to change that one. But I do
have the choice to reduce the size to 128 x128 or increase it to 512 x 512 if
I desire (which for this texture I do not).
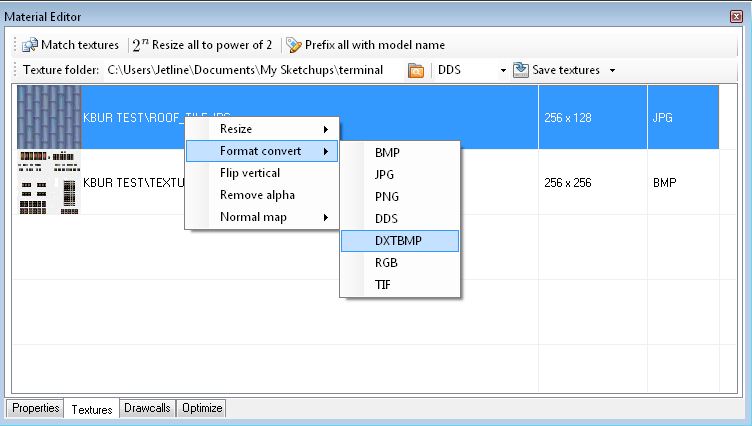
21. Right click the image once again to convert the image from a JPG image to a DXT1 BMP bitmap. Select Format convert and select DXTBMP. Since the texture1.bmp file is already in 256 color BMP format I will not change its format. If my texture was instead a 24 bit (millions of colors) image I would change the texture to DXTBMP format. If I were modeling for FSX I would select the DDS choice instead.
Now the great thing - all of your texture references in your MCX Materials have been automatically changed to the new names! To check this, go to the Properties tab at the bottom left and note that the material name has been changed to the new texture name (see image below).
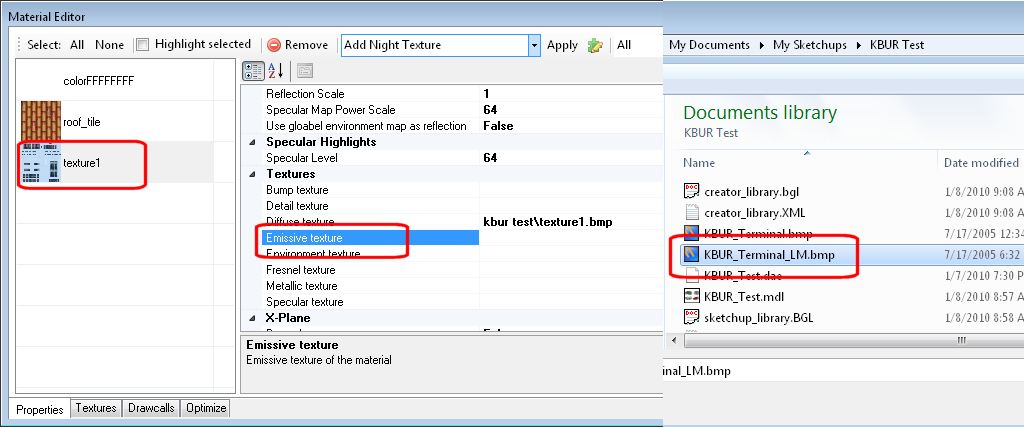
22. Now the only thing left is to add the _LM night texture (if you have one)
to the material(s). First copy the night texture into the same folder that contains
the day time texture. Then open the Material Editor (if you closed it) by clicking
its button on the MCX screen, choose the Properties tab, and
click on the Material's name on the left. Scroll down on the right until the
current texture name is displayed. Click the Nightmap Texture line below that
and then click the ... button. Browse to the correctly named texture. Continue
this until you have them all added, and finally press the little red X on the
Material Editor dialog box to close it. NOTE: Do NOT
click the large red X on the main MCX screen instead!
23. Don't be surprised if you suddenly get some black and white checkerboards appearing on your model at some point. Once you make the conversion, MCX may be looking for textures only in something called its Texture Search Path. Since your folder isn't on that path, your textures might no longer show up on the 3D model. You can add this folder to the Path (in Texture Options), but I don't bother. Just continue with the conversion.
24. Now you need to save your textures into your specified texture folder. Select the type of bitmap you want (DXTBMP for FS2004, DDS for FSX) in the drop down box, and click on the Save Textures button.
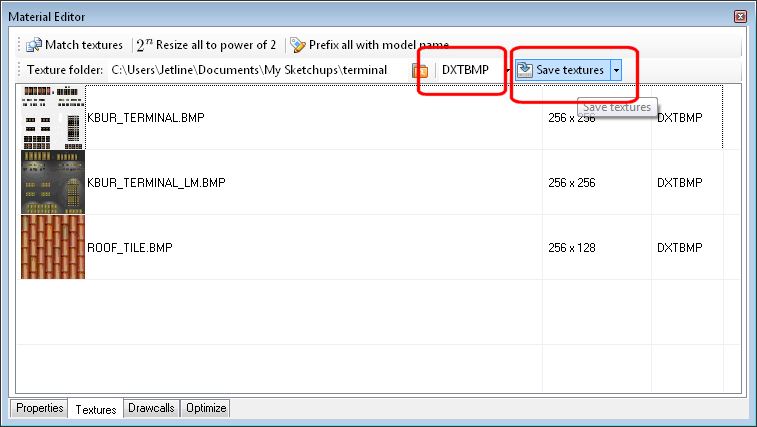
24. Now press the Export object button and select FS9 MDL Object as the type in the drop down box. If MCX cannot find MakeMDL, use the Options menu or button and go to the Exporter Settings and set the MakeMDL path (click the MakeMDL path line and then the button with ... on it and browse to where you installed it above). If you are creating an FSX library, you need to use the FSX MDL Object choice instead, and make sure the path of XtoMDL is set correctly.
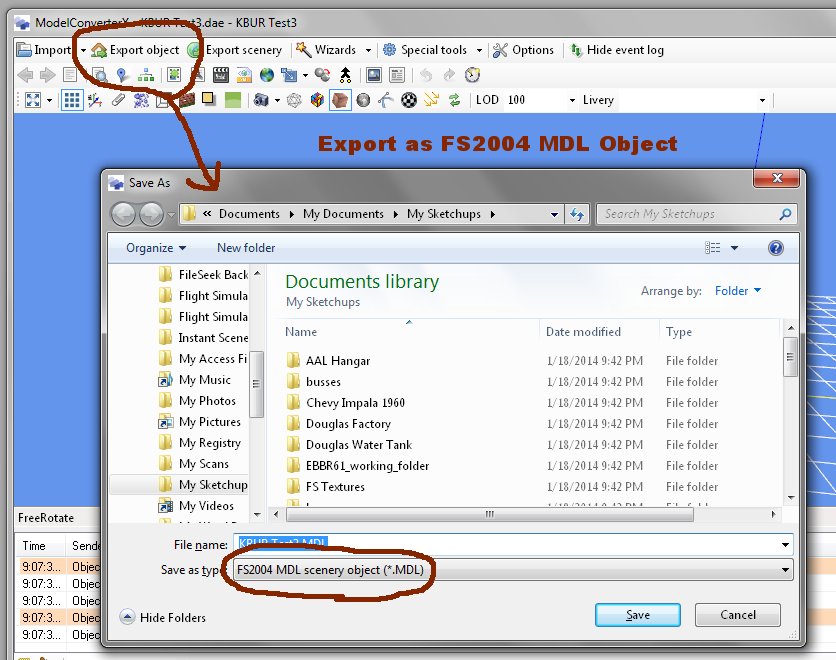
Note that the file name for the MDL file created above cannot
have spaces and not begin with a number or punctuation! MakeMDL
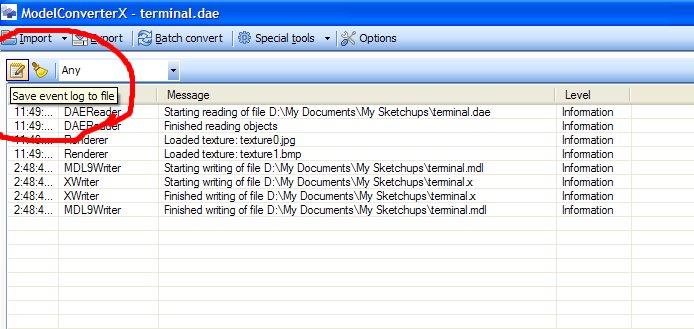
quirk. If you don't get an MDL file created, click on the Event Log
tab at the bottom left of the MCX screen, and find out what went wrong.
You can click the little button in the upper left to save the log as a text
file, in case you need to post it to a forum or send it to someone:
Next we'll get it into Flight Sim. I use EZ-Scenery for this, but I suggest that if you will be doing any scenery work at all you buy Instant Scenery - it is cheaper and does more. However, if you already use Rwy12 or ADE or other freeware scenery library object placement program feel free to use that instead.
25.First download and install Arno's Library Creator XML program:
26. For FS2004 you will also need the BGLComp SDK installed from MS.
27. Starting Library Creator, use the Options/FS2004 BGLComp Path choice and browse to it (where you installed it). If you are creating FSX libraries, you will need to use the FSX BGL Comp path menu choice instead. It can be found in your FSX SDK that you installed above.

28. Now select Options/Relative Paths. This makes the XML file cleaner and clearer.
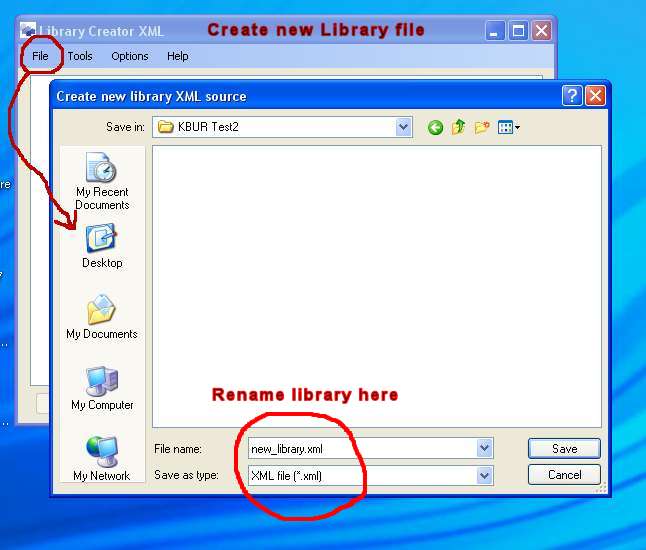
29. Then choose File/New Library. Create the new library XML file in the same folder where you saved the MDL file in MCX. I call mine something like KBUR_library.XML. This will also be the name of the final library BGL file.
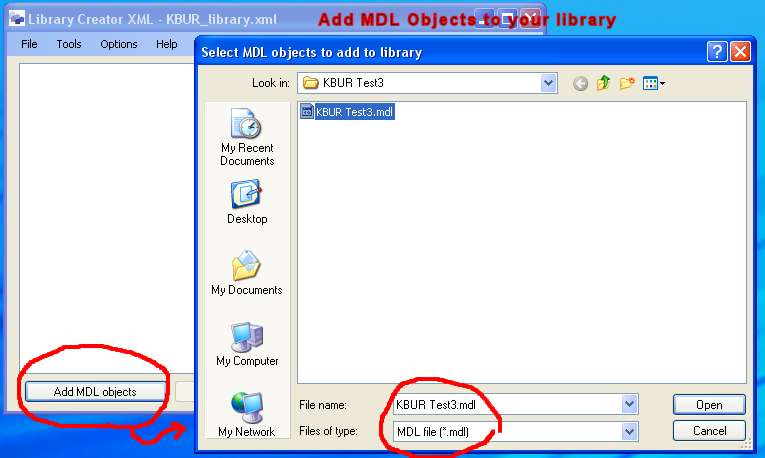
30. Now click the Add MDL Objects button and add your new MDL file. You can include many buildings for the same logical area (i.e. around one airport) in this same library (add them later if you like as well). Note that you can include FS2004 *or* FSX library MDL files, not both, in a single library.
31. Finally, use File/Save Library and then File/Compile Library choice:

32. Hopefully you will now have a BGL file in the same folder as the rest of the files. That should now be copied into an active scenery folder.
33. Copy your texture files (the ones with the correct names and in an FS compatible format) into the texture folder that corresponds with the scenery folder we copied the library BGL file into (step 32).
34. Use your favorite scenery program (Rwy12, ADE, EZ-Scenery, Instant Scenery, SceneGenX, etc.) to place your new library object into your airport scenery:
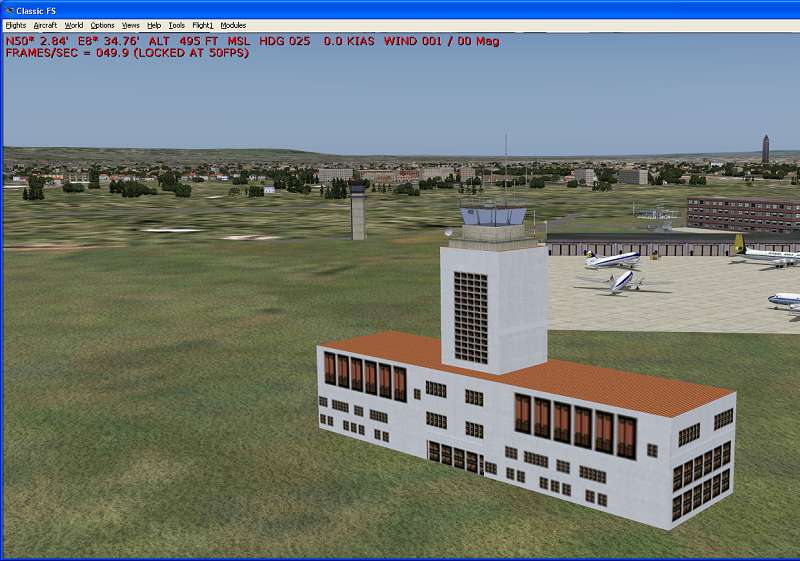
You may have to adjust the Scale value to get your building to be the right size. I've added a default control tower on top of my tower (one of the small towers in the generic.bgl library file) to make it look a little nicer. :)