CONVERTING FS2004 AIRCRAFT TO FSX TUTORIAL
TABLE OF CONTENTS
Introduction and Downloads
Part 1: Setup
Part 2: Saving and Animating the Props
Part 3: FS2004 Import
Part 4: Setting Up Landing and Taxi Lights
Part 5: Conversion to FSX
Part 6: Editing Materials and Textures
Part 7: VC & Appendix
PART SIX - SETTING UP THE MATERIALS AND TEXTURES
FS TEXTURE FORMATS
The
first bit of information is that some bitmaps include an alpha
channel. An alpha channel is an invisible part of a bitmap used
to designate
areas of reflection or transparency. You can visualize it in
DXTBmp
The
typical BMP files found in most paint programs are usually called 24
bit BMP files. These will not display in FS. Instead, FS
uses special BMP formats, including:
DXT1
- often used for partially transparent signs using a black/white alpha
channel, or simple scenery textures with no alpha channel.
DXT3 - often used for aircraft with reflection, using a grayscale alpha channel (white = no reflection, black = shiny chrome).
888 or 32 bit - used for the same things as DXT3, but higher quality (and thus more disk space and graphic card load).
For FSX and later they added another file extension name, DDS, and one more format:
DXT5 - a better (?) way to create DXT3 textures.
We
will use DXTBmp to examine the textures of the plane, and you can even
use it to edit them if you like (along with a paint program).
If this is a plane created in GMAX, all texture names containing _t or
_T use the alpha channel for bare metal reflections. Those without _t
or _T are either normal textures (no alpha channel) or use the alpha
channel for transparency (i.e. glass, blurred props, etc.). If the
plane was created with FSDS there is no such naming convention, but
FSDS planes still use the 3 basic types of textures (normal,
reflection, and transparency).
I
have been describing day
textures above; there may be night textures as well, which light up
cabin windows (drawn on the texture, not modeled), or things like logo
light splashes on the vertical stabilizer. These typically have
the name of the day texture, but with _L added to the name.
The basic tasks we need to perform here are to assign night
textures to all materials that have them, set reflections if needed, and set the transparency for
all materials that need them.
ASSIGNING NIGHT TEXTURES
While
I will be describing each of these settings separately, there is no
reason why they can't be combined for a given texture - for example,
you can assign a night texture and adjust the settings for reflections at the same time.
1.
Look in the plane's texture folder using Windows Explorer/My
Computer.. You may see files engine ending in _L. These are
the night textures. A few planes have them ending in _LM, but
that's rare. Take note of the textures that have both a day
texture and a night texture.
2. If not already loaded, Import the latest version of the plane into MCX. In our example it is dc6b.mdl.
3. Click the Material Editor button.
4. Each texture is contained inside a material.
This material provides the instructions for FS on how to load and
display this texture. On the left side of the screen click on a
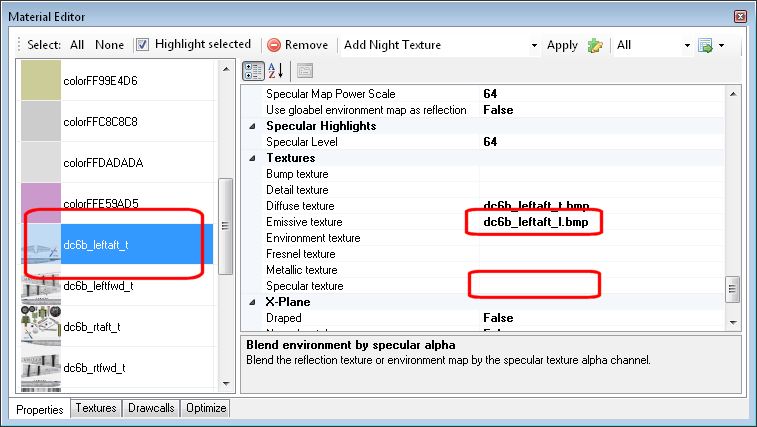
material (texture) that has a night texture.
5. On the right
side of the screen you see the properties of that material.
Scroll down near the bottom and find the Textures section.
The Diffuse texture is the day texture. Click in the Emissive Texture
box, which is the night texture. Type in the name of the night texture (usually the day
texture name changed to/added _L) or click the ... button and browse to it.
After making such a change I click on the scroll button inside
the scroll bar - this Editor can act funny after each edit, and you
don't want to do something unintended.
6. If there is a filename in the Specular Texture slot, highlight it and remove it.
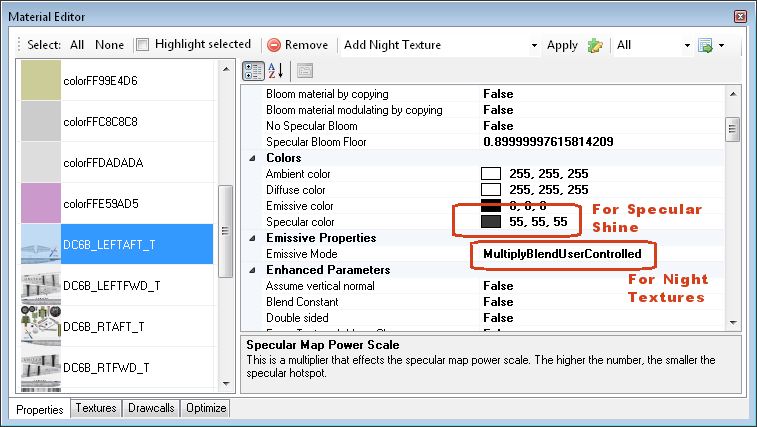
7. Near the top of the properties list, you will find a section called Emissive Properties. In the Emissive Mode line, choose MultiplyBlendUserControl from the drop down box. NOTE:
You may use any of the user controlled choices, but this is the
one I prefer. You can experiment and try them all. Test in
FS at dusk and at night. NOTE: The specular shine value in the image below is used in the next section.
8.
Repeat this for each material (texture) that has a night texture.
In the DC-6B example all day textures ending with _t have night
textures, as do the Interior, Virtual Cockpit, and Virtual Cockpit 2
textures.
SETTING REFLECTIONS AND SPECULAR HIGHLIGHTS
Note
the difference between reflection (the chrome effect of polished metal)
and specular highlights (the reflection of the sun off a shiny object).
9.
When you look at the materials listed on the right, some may
include areas that need to be shiny and/or have bare metal. In GMAX planes bare metal textures are all
textures ending in _t or _T. This is true for the example DC-6B.
If you want the material to have a shiny surface (i.e. it's not dull appearing):
Colors
Specular Color: 55, 55, 55 (see image above)
If you wish the bare metal to have reflections, then for each of
these materials set the following:
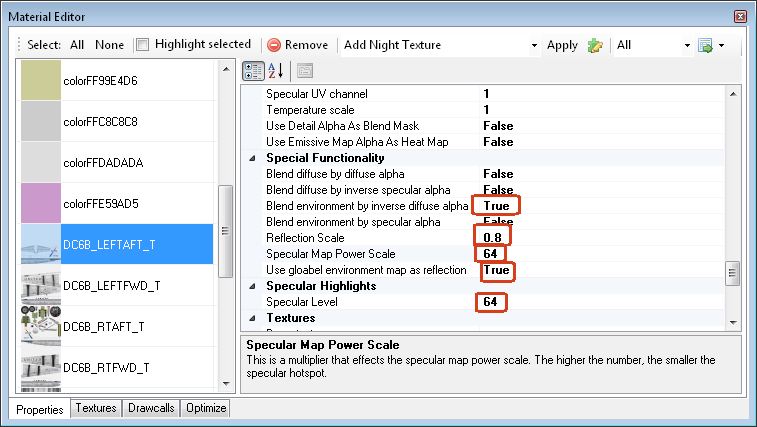
Special Functionality
Blend environment by inverse diffuse alpha: True
Reflection Scale: 0.8
Specular Map Power Scale: 64
Use global environment map as reflection: True or False (see below for environment map)
Specular Highlights
Specular Level: 64
10.
This is for rather shiny objects. If you want the surface
of this material to appear dull, leave the Specular Color set at 0, 0,
0. Vary this as desired.
11. If you only want
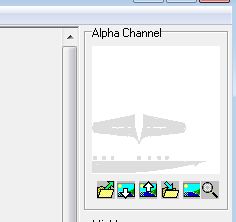
reflections for textures that had them in the FS2004 aircraft, load
each texture into DXTBmp and look at the small square in the upper
right - this is the alpha channel. If there is a gray area where
the bare metal is located in the day texture, then this texture is
designed for reflections, and should receive the values above.
Here is an image of the alpha channel from a DC-6B texture, note
the bare metal areas and windows are gray.
12. Repeat this for each bare metal texture you want reflections.
13.
Note that if the texture does not include gray alpha channel
areas where the bare metal is, there will be no reflection. You
would need to create such an alpha channel in your paint program and
add it via DXTBmp (Alpha/Import Alpha Channel).
14. Optional.
Note that FSX and later sims handle reflections quite differently
from FS2004. This means that FS2004 textures used as is in FSX
and later will have very little reflection.
If you want more reflection for an FS2004 texture that
already has them specified in the alpha channel, you would need to edit
each of these textures. Set up DXTBmp to send textures to your favorite
paint program (Prefs/Select Editor). Then load the texture into
DXTBmp, and send the alpha channel to your paint program with
Alpha/Send Alpha to Editor, and darken the alpha channel by a
reasonably large amount (not black!). Save this trans.BMP image
(do not close your paint program). Then back in DXTBmp, choose
Alpha/Refresh Alpha and the gray in the alpha channel box should get
darker. Choose Save, OK, and overwrite is Yes. To test in
FSX or later if the plane is already loaded, go to
Options/Settings/Display and move the Global Resolution slider one
notch up or down. Click OK. The edited texture should now
display on your plane. Adjust the darkness of the alpha channel
until you are satisfied - edit the trans.BMP file, save it again, and
repeat the process in DXTBmp and FS. When finished leave the
Global Resolution slider at the maximum.
SETTING TRANSPARENCY
15.
Usually there are only a few textures that require transparency,
often glass and blurred props. In the DC-6B there is Glass,
Blurred_Prop, and Interior that need transparency. For those
materials (textures), select one, then in the drop down box at the top
of the Material Editor choose Set Default Transparent, then click the Apply
button just to the right of the drop down box.. For glass (only) see the recipe below.

NOTE:
I find it works better with lots of parts (especially those that
will get repainted into several versions with different alpha channel
values) to set the Alpha Test Level to 1, from whatever number Set
Default Transparent set it. I use this for blurred props, for
example.
16.
If you want your glass to reflect like real glass does, try using these
settings for the Glass texture instead (thanks to Bill Leaming for
these settings):
Alpha Test
Apha Test Function: Always
Z-Test Alpha: True
Bloom
No Specular Bloom: True
Colors
Specular Color: 55,55,55
Enhanced Parameters
Z-Write Alpha: True
Final Alpha Blend
Final Alpha Multiply: 255
Set Final Alpha at Render Time: True
FrameBufferBlend
Destination Blend: InvSrcAlpha
Source Blend: SrcAlpha
Special Functionality
Blend diffuse by diffuse alpha: True
Reflection Scale: 2
Specular Map Power Scale: 256
Use global environment map as reflection: True or False (see below for environment map)
Specular Hightlights
Specular Level: 64
Textures
This looks best with a Specular Texture that is relatively dark. I used the Glass.bmp texture for the DC-6B, and any handy solid dark texture for other planes.
Some
of these transparent parts may not appear correctly in FS,
or they may not appear at all. In this case experiment with the
Alpha Test Level near the top of the properties list. It is
set at 20-100 by default, but other values might be better. Most
of the time the default is fine.
In some cases (like Manfred Jahn's Connies), the glass is made to use the FS2004 Opacity setting in the material color, rather than in the alpha channel. This is not supported in FSX
and later sims, but you can simulate it. Here are the settings I
use; the Final Alpha Multiply number may need to be changed for some
planes.
Use the drop down box and choose Set Default Transparent. Click Apply. Then set:
Final Alpha Blend
Final Alpha Multiply: 0.7
Set Final Alpha at Render Time: True
Special Functionality
Blend environment by inverse diffuse alpha: False
Blend diffuse by inverse specular alpha: False
Blend environment by inverse diffuse alpha: False
Blend environment by specular alpha: False
Reflection Scale: 1
Specular Map Power Scale: 64
Use global environment map as reflection: False
Specular Highlights
Specular Level: 64
Textures
Use the Diffuse Texture name for the Specular Texture as well. No Environment Texture.
17.
The "use global environment map for reflections" set to True for bare
metal and glass materials is often quoted as being the correct setting
for most situations and you can use that setting if you prefer..
However, I prefer to use the following settings:
Special Functionality
Use global environment map as reflection: False
Textures:
Environment texture: GLOBALENV_AC_CHROME.DDS
This
is a default file in the main FSX texture folder and will be used
automatically when specified as above. It gives a smoother
reflection and does not turn the bare metal green.
18.
Finally, there is an even better replacement environment map that
you can use - this has the advantage that the day texture doesn't bleed
into the bare metal from certain angles. It's by Bob Rivera and
is globalenv_texturesv1.zip at AVSIM, but it is at other places too.
You can place this into each of the plane's texture folders, or
use a texture.cfg file to specify its location. I have not placed
it into the main Texture folder (replacing the default texture) in case
that causes problems for other objects in FSX.
19. One last thing - if you are going to be applying these settings on a more than one time basis, you can use the Material Template Editor
function of the Material Editor (a button just to the right of the word
Apply) to create templates that will appear in the drop down box at the
top. For example, I created two - Glass and Metal Night Lit with
the settings I list above. Now all I need to do for a given
material is to select it, select the proper choice from the drop
down box, and click Apply. Specify my maps in the Textures
section and I'm done.
20. Export
your plane back
into its standard name (overwrite), check/change the bounding box with
RADItor or MDL Tweaker if needed, and load into FSX (or later).
You may have to do the Import and then Export (overwrite) again
to fix displaced parts. The
slow/blurred props and cockpit windows should be partially transparent,
the bare metal may have a slight reflection (look closely), and if you
go to night time the night textures should turn on using the L key
(lights). The sun should also glint off the surface from certain
angles when the sun is high in the sky. When looking through the
blurred props clouds should be visible behind them (if present)
In the DC-6B, if you open the passenger door and look
into the fuselage the windows on the other side should be transparent.
21.
Make a copy of your plane's MDL file and paste it back into the
folder. Rename it something like dc6b - FSX3.mdl and we'll keep
that as a backup.
22. If you want to use DDS textures instead
of BMP, that's fine. Just create new DDS textures and store the
BMP files away for safekeeping. As long as the DDS textures have
the same name as the BMP files, they will be used automatically.
For example, create a texture named Interior.DDS to replace the
Interior.BMP file.
SETTING THE FINAL BOUNDING BOX
1.
If your model after conversion had huge numbers in
RADItor or MDL Tweaker and you had to change them all to a generic
number, you can now change them to more accurate values for your final
plane.
2. Open RADItor or MDL Tweaker (if not already open) and load the plane.
3. In MCX open the Object Information box.
4. Bring up RADItor or MDL Tweaker on top of MCX, side by side with the Object Information window.
5.
Enter the numbers iin the BoundingBox section of the Object
Information box into the RADItor or MDL Tweaker boxes (use the largest
number for the radius):

6. These are the values for the DC-6B, if needed. Press Write or Save MDL.
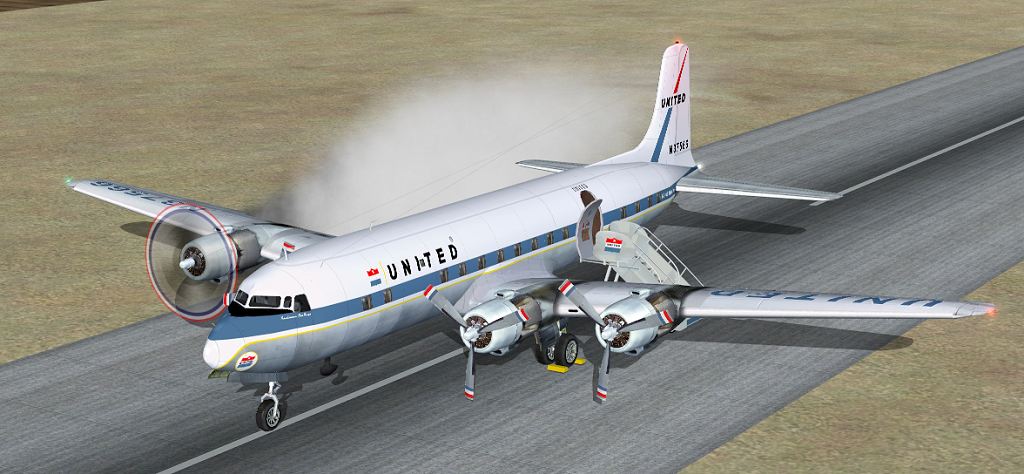
That's it - enjoy your new FSX or later plane! My FSX DC-6B starts her engines - the ramp guy better get the door closed soon!
Next: PART SEVEN - VIRTUAL COCKPIT & APPENDIX