Repainting Tutorial Index
Getting Started
Creating a Layered PSD
(optional)
|
Repainting Tutorial Index Getting Started Creating a Layered PSD |
These pages will describe how to paint FS2002/FS2004 aircraft, complete with reflections and night lighting. We will be using Paint Shop Pro 7.0 (PSP) from Jasc Software (now Corel), although the general approach will also be applicable to other painting programs like Photoshop, etc. Earlier versions of PSP (but greater than 4.0) will do all but the light splash effects. Later versions will do the same thing, but differently (use your manual to find out how to do it in your version). PSP 7.0 is generally available for free download for a trial period, payment is required for further use. We will also be using Martin Wright's DXTBmp to convert our textures into the final FS BMP format (freeware). Please Note: there are many ways to repaint these planes - I'm describing the one I use, which may not be the "best" but works well for me. August 2012 update - I am now describing a method which might be easier to follow, and works more reliably.
For an example, I will use the forward left fuselage texture of the plane that has been the "standard aircraft" here at CalClassic - the GMAX United DC-6B Base Pack. You can download both the DC-6B CB-16 Base Pack, the American Airlines textures, and the DC-6B Paint Kit from this page. Download and install the DC-6B CB-16 Base Pack, then download and install the American DC-6B textures and add them to the Base Pack. Instructions in the text files.
The texture is called dc6bleftfwd_t.bmp. For GMAX planes the _t ending of the filename tells us that this is a daytime texture that includes reflections (textures ending with _L are the night textures). FSDS2 aircraft do not require the _t ending for daytime reflective textures, and so may not have it. Follow these instructions as written, but leave the _t off. They will have _L night lighting textures though. We'll start with an American Airlines texture and repaint it into a United texture. The finished repainted daytime texture looks like:
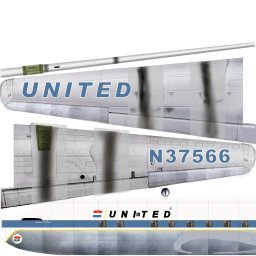 |
This texture includes the left forward fuselage, the left wing (top, bottom, and leading edge), and the landing light texture. This will give us all the different parts we need to demonstrate how to repaint an aircraft.. |
Step 1: Creating a new copy of the aircraft to repaint:
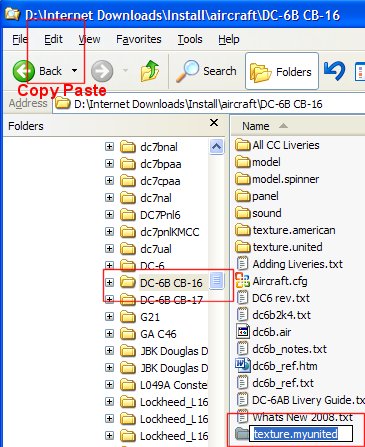
First we need to make a copy of the existing plane, to avoid overwriting our original. We'll use Windows Explorer for this (and all later file manipulations). You can start it from the Start menu: in Windows XP it's at Start/All Programs/Accessories/Windows Explorer. Typically My Computer works much the same way and you can use that if you are more comfortable with it. In the pictures below I have Explorer set to View/Details. I also click the folder image at the top of the screen to get the folder view on the left, and the files view on the right.
|
I have already downloaded and installed the American Airlines DC-6B textures as described above and I want to repaint it into United colors. This will be our example. It's inside the DC-6B CB-16 folder, called texture.american. Yes, we already have a United livery, but this is just a tutorial. Find the plane's folder in the FS AIRCRAFT folder, and double click on it to open it (in our case it is the DC-6B CB-16 folder). Then click once on the texture.american folder to highlight it. Then press the Copy button at the top, and then the Paste button (or choose Edit/Copy and Edit/Paste). This will create a copy (in this case called Copy of texture.american). It will be located at the very bottom of the list of folders (i.e. look way below the DC-6B CB-16 folder in the list). Click once on the copied folder to highlight it. Wait a moment, then click it again to open the filename for renaming (or right click and choose Rename). Type in a new name. Since we will be repainting it into United Air Lines colors (and there is already a United texture in the folder), we will rename it texture.myunited. You can see that I have already done this, and the folder is already present in the list. |
You will also find a file here called the aircraft.cfg file, which contains the identity information of this aircraft. We need to change this. Double click the aircraft.cfg filename, and it will open in Notepad or Wordpad. The top portion will look something like what is listed below. Copy the American entry that you added earlier (when you added the American textures to the Base Pack) and paste it back into the file at the bottom of these livery sections (NOT the bottom of the file). Next we'll change the lines to create our new United DC-6B's identity. You will change these lines to match your new plane's identity, of course:
[fltsim.1] change this number to one higher than the last section present
title=DC-6B American Airlines 1960 change to title=DC-6B United Air Lines Repaint
sim=dc6b
model=
panel=
sound=
texture=american change to myunited
kb_checklists=
kb_reference=dc6b_ref
atc_id=N90756 change to atc_id=N37566
atc_id_enable=1
ui_manufacturer=Douglas
ui_type=DC-6B
ui_variation=American Airlines 1960 change to ui_variation=United Air Lines Repaint
description=The DC-6B was generally considered to possess the best operating economics of any piston airliner built. Passengers also appreciated their smooth, quiet ride. American had 25 DC-6B's, and used them throughout their US system. change the last sentence to read "United had 43 DC-6B's,..."
atc_airline=American change to United
atc_flight_number=960 change to 637
atc_heavy=0
visual_damage=1
prop_anim_ratio=0.9
That's it! Save the file, and then quit the editing program. From now on we will be using the textures found in our new plane's texture.myunited folder. Double click the new texture.myunited folder, and it will open. If you are using a "paint kit" put those files in that folder as well. In this example we will be using the dc6bleftfwd_t.psd texture found in the DC-6B Paint Kit you downloaded earlier. Copy this file into your texture.myunited folder.
Step 2: Finding photos of your aircraft:
There are many places to find photos, but you can start by doing a web search. Using www.google.com and searching for United DC-6B comes up with several sites. My favorite is www.airliners.net, and we'll use that site to find a photo of our paint scheme. Go to that site, and select Douglas DC-6 from the Choose Aircraft Type list. Then choose United Airlines from the Choose Airline list. Now press Show Me the Photos!. A list of thumbnail images will appear (12 in our example). You can use these to guide your painting. Click on Large or Medium for a larger image. In addition, for the next step in this process try to find one that has good color balance (i.e. the white is a good clean white - not bluish or yellowish) and click on Large. Now right click on the image and select Copy Image (or similar). If airliners.net doesn't have a good image, save one from another site. Note: do not use this image for any use other than suggested below. When finished with it delete it from your computer - it is copyrighted.
Another favorite site is aeromoe's Airline Fleets page. Go there, go to the Index, and click on the first letter of the plane's airline (US airlines only). It will list the registration numbers, and often the fleet numbers, years in service, and any names (like ours is "Mainliner San Diego").
Step 3: Getting the colors of our plane:
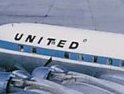
Start up Paint Shop Pro (PSP). Then choose Edit/Paste as New Image and the aircraft picture we copied above should now load into PSP. In my example, I am using an image from John P. Stewart, but will not display more than a tiny fragment due to copyright restrictions.
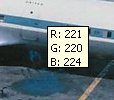 |
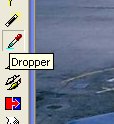
While this image is pretty close to "normal" lighting, the white color is not truly white. In PSP, click on the Dropper tool and put the cursor over a nice white area of the picture. In my example, it reads Red: 220, Green: 215, Blue: 221. While perfect white is 255, 255, 255, real photos almost never have things that white, but it should be closer to, say, 220, 220, 220. This image is very close to that. If you needed to lighten or darken the white first (to get the highest of the 3 numbers to 220), you would select Color/Adjust/Brightness-Contrast. You would then change the Brightness slider to get the highest of the 3 RGB numbers to around 220. Leave or set the Contrast slider at zero. In this case I set the brightness to 3. After that you need to bring the other two numbers to 220. Choose Colors/Adjust/Red-Green-Blue. Increase the other two colors by very small amounts until you get the white close to 220, 220, 220. In this case I increased the Green by 2%, and ended up with a white around 220, 219, 221. Note: photograhic images will have widely varying white values - just use an average value. Also, many images have faded or color shifted in other ways that a simple technique cannot correct. Make sure that the color looks correct to your eye as well. |
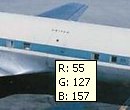 |
Now choose a portion of the blue color that is nice and strong, without any sun reflections or other odd lighting effects. I'll select the blue on the passenger door - that looks nice and strong. Set this color as the foreground color by selecting the Dropper Tool and then left clicking on the blue stripe on the passenger door. I got a color of 55, 127, 157. We'll use this as our color for the blue stripe. |
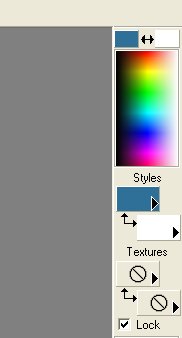 |
While it's a good idea to write these color numbers down, we can also save it in PSP for later use. Make sure that the Color Palette is showing (usually on the right hand side) by clicking the Toggle Color Palette button on the top toolbar (vertical color stripes). It shows your current foreground and background colors (blue and white in this example), and notice the Lock checkbox at the bottom. If this is checked, then you will use the current (i.e. blue and white) colors for all tools. If not checked, each Tool will remember it's own colors. Also, the two-headed arrow at the top is a fast way to swap the foreground and background colors.
|
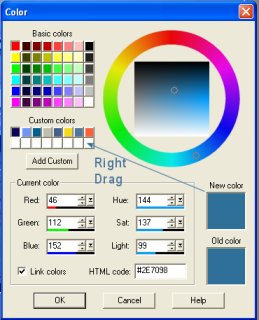 |
Click on the middle of the new blue foreground color we created above (underneath the word Styles). Our color is now in the "New Color" area of the resulting dialog box. Now right click and drag the New Color to an unused color square in the Custom Colors color area. Our new color will be saved there. Repeat this process with all custom colors to be used for the paint job. Note that you should first check the "Basic Colors" section to see if the desired color is there - use that and save your Custom Colors when really needed. |
Step 4: Selecting PSP as your editor for DXTBmp:
 |
Start DXTBmp and choose Prefs/Select Editor. Browse to your psp.exe program, click on it once, and click Open. |
Step 5: Decide on a single layer BMP or a layered PSD texture file:
You now have two choices. Paint the BMP image supplied with the aircraft (a single layer), or use a layered image to paint with. There are two possibilities to get a layered image - either you might have a "paint kit" that already contains a layered image, or create your own. It is my personal preference to paint using layered images (except for very simple repaints), and thus we will use that. If you do not have a paint kit, you will need to create a layered PSD image - this is described in Part 6 . I will now assume you have a layered image.
OK, we're done with the preliminaries! You should now have 2 versions of each texture you want to repaint - the original BMP, and the layered PSD file.
Short tutorial on painting using a single layer:
If you prefer to paint using a single layer BMP (i.e. repainting the image as provided with the plane), you can use these instructions to handle the image and alpha channel instead of those described later.
Let's move on to Part 2 - Painting the Aircraft