Repainting Tutorial Index
Night Lighting
Creating a Layered PSD
(optional)
|
Repainting Tutorial Index Night Lighting Creating a Layered PSD |
The night lighting in FS most often confuses new painters. Luckily, if you haven't changed the window arrangement, you can almost always use the night textures as is. So you probably don't need to edit these files. However, if you have created a cargo version from a passenger plane (or visa versa) or have changed the window arrangement, then you'll need to edit them. Also, if want to add or remove things like logo lights or other effects, this is where that is done.
Night lighting in FS2002/FS2004 aircraft is contained in textures that end in _L. These otherwise have the same name as the daytime textures which often end in _t. Thus in our example where the day texture is dc6bleftfwd_t.bmp, the night texture is dc6bleftfwd_L.bmp. They are overlay textures; that is they will add their light to the daytime texture. Thus, night textures can be plain black and white textures - black for no light, and white for areas that are night lit. For light splashes you use varying shades of gray to simulate the fading amounts of light hitting the surface as the distance from the light increases. You can also use colors other than white to either simulate a colored light shining on the surface, or (for example) light shining through colored curtains in the windows. With that said, I find it easier to use parts of the daytime texture for the night texturing, and it works fine.
These textures also use an alpha channel (as do the daytime textures), but it is much simpler than for reflections. Areas of the night texture that have a black alpha channel will be illuminated whenever the panel lights are turned on (i.e. at night). This is used for things like passenger windows. If the alpha channel is white, these areas will shine whenever the landing lights are turned on. This is used for landing light splashes, ice lights, etc. You can also have a gray alpha channel, but then the light is on with the panel lights and gets brighter when you turn on the landing lights - not very useful. So we'll use simple two color alpha channels - black and white.
So, the 4 options are:
| Black texture area | Black Alpha Channel | Unlit |
| Black texture area | White Alpha Channel | Unlit |
| White texture area | Black Alpha Channel | Lit when Panel Lights are On |
| White texture area | White Alpha Channel | Lit when Landing Lights are On |
There are also aircraft that use the older _LM textures for night lighting. These textures completely replace the daytime texture, instead of overlaying them. They are handled much the same as _L textures, but they must have the daytime texture lit up where lighted, and darkened where dark. They also do not use an alpha channel, are are typically in 256-color or DXT1 format. I will not describe these further; the existing _LM texture should tell you enough for you to repaint it after reading this part of the tutorial.
I'll first show how to set up a brand new night lighting texture, so if you already have textures in the plane's TEXTURE folder that end in _L then you should skip Step 1 and do Step 1A instead.
Step 1: Creating a new _L Night Lighting Texture
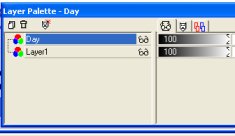 |
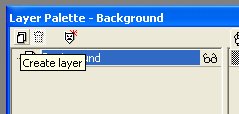
Load the daytime _working BMP image we just created in previous steps into PSP. Use File/Save As to save a copy of this file with the same filename except with the _L extension. For our example, we would save dc6bleftfwd_t_working.bmp as dc6bleftfwd_L_working.bmp. Right click on the single layer in the Layer Palette and choose Duplicate. Right click on the new layer and choose Rename. Name it Day. This will be our temporary reference layer so we can relate the locations of the lights and windows in the daytime texture to the same locations in our night texture. Click on the bottom layer in the Layer Palette. Choose the Preset Shapes Tool and set it to Rectangle, without Antialiased checked. Set the foreground and background colors to 0,0,0 black. Now drag across the entire image to turn this entire layer black. This will be our "canvas" that we'll paint our lights upon. You can now skip to Step 2. (The other way to do this is to use the Flood Fill tool with the Tolerance set to 200.) Note: many painters use a black somewhat brighter than 0,0,0 so the entire plane will "glow" slightly so it can be seen more easily at night. I don't do this though. |
Step 1A: Creating a Working Night BMP File from an Existing Night BMP File
|
You will need to create a working file from the original night BMP texture. Remember that night textures end in _L. Thus, in this example (using the daytime texture dc6b_leftfwd_t.bmp) you should start with the file dc6b_leftfwd_L.bmp. In DXTBmp, choose File/Open. Browse to your plane's texture folder and open the night texture. Choose Image/Send to Editor. PSP will open with this image. Choose File/Save As, browse to your plane's texture folder, and add _working to the original file name. In the example I would save this file as dc6b_leftfwd_L_working.bmp. Close PSP. Now we need to save the alpha channel. In DXTBmp choose Alpha/Send Alpha to Editor. Save the resulting image in PSP with an added _alpha in the file name, in the plane's texture folder. In my example I would save it as dc6b_leftfwd_L_alpha.bmp. If you are only going to remove a few windows from the image, you can do that by choosing the Preset Shapes Tool, and set it to Rectangle and no Anitaliasing. Set the foreground and background colors to 0,0,0 black and draw rectangles around the window(s) you want to remove. Save the file, and convert back to a DXT3 file with alpha channel in DXTBmp with the original _L.bmp file name (Part 2, Step 2). You are finished with the tutorial - congratulations! If you need to do more extensive editing, it will help to have the daytime texture as a reference layer. Open the equvalent working daytime BMP file into PSP (in our example it would be dc6b_leftfwd_t_working.bmp). Choose Edit/Copy. Open the working nighttime BMP file in PSP (if not open), and choose Edit/Paste as New Layer. |
Step 2: Editing the Night Lighting Texture
|
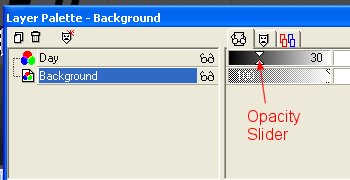
Let's start with the windows, since they are the easiest. Click on the Day layer in the Layer Palette to make it current, and use the Magic Wand tool to select the windows. Don't forget the small bathroom and door windows, and select the ice light too if included. Choose Edit/Copy. Tip: A quick way to do this is to load the daytime PSD file into PSP, choose the Windows layer in the Layer Palette, and then use the Selection Tool to drag a rectangle around all the windows at one time. Then click on a window and the windows will all be selected perfectly. Choose Edit/Copy. Now make the night BMP current (if it isn't already) and make the bottom layer the current layer. Reduce the opacity of the Day layer to 30% by using the slider in the Layer Palette, so the night layer shows through. Choose Edit/Paste as New Selection. Move the copied windows exactly over the existing windows of the Day texture reference layer, and click to anchor them. If you want them to be brighter, you can brighten the windows by choosing Colors/Adjust/Brightness-Contrast, and then increasing the Brightness control (leave the Contrast at zero). You will probably have to experiment with this to get the effect you want, but I find that the copied windows are bright enough without lightening. Finish with Select None. |
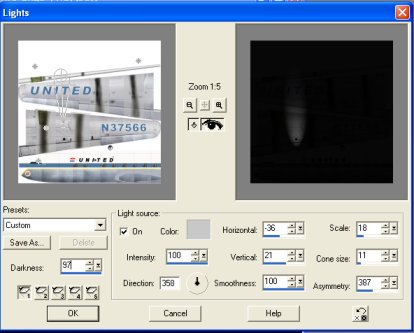 |
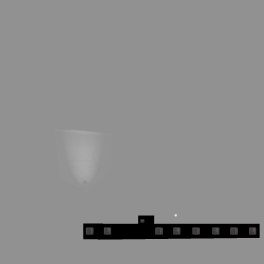
Now let's do the light splashes. These can be used for logo lights, etc., but I'll do a landing light splash on the bottom of the wing. PSP has a light effect, but you will need to practice with it, since it can be a little overwhelming at first. Note: you must be using PSP 7.0 or later for these effects Choose the Day layer, and increase its Opacity to 100. Choose Effects/Illumination Effects/Lights.. Set the values to the ones you see here. There should only be one light button pressed, number one. Click the other lights (lower left corner above the OK button) and uncheck the On box to inactivate them if already checked. Drag the dot at the bottom of the gizmo in the left window to move the light. The current position in the image makes the light appear just past the landing light (the black circle next to the flap). Look in the right panel for the location, or even better press the Eye and Down Arrow buttons in the middle of the box and look at the texture itself. You can also manipulate most of these numbers graphically, by stretching/moving parts of the gizmo with the mouse. Experiment with that for different effects. Once you have it where you want it, you can reduce the Intensity if you like - I use 75. One hundred makes it easier to see while positioning. Click OK. Note: if you want a brighter light, decrease the Darkness number. However, you will need to copy and paste (below) carefully, since the surroundings will not be truely 0,0,0 and will light up the entire selected piece. Another strategy is to use the Flood Fill tool within the selection to change almost black pixels to true black. |
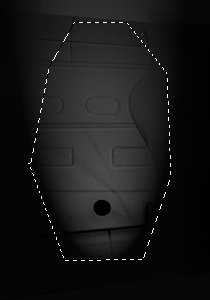 |
Now we need to select the lit area and paste it into our night layer (the bottom layer). Use the Freehand Tool (Point to Point) to lasso the lit area, plus a little more beyond. Choose Edit/Copy. Move the mouse to the top corner of the selection, and read the pixel position in the status bar. Click the eyeglasses in the Day layer to make it disappear and click the bottom layer name to make it current. Choose Edit/Paste as new Selection. Move the selection until it is close to the correct position, and click it to anchor it. Move the mouse to the upper left corner of the selection, and drag it until the corner is in the same place it was in the Day layer. Select None. |
| If you have more than one light splash to place on this texture, you can do one of two things - activate two lights instead of one in the Lights Effect box and create them both at the same time (use the light buttons to switch between the two lights), or you can do them one at a time. After pasting the first light splash into the bottom layer, make the Day layer current and paste a new daytime image from the daytime working BMP into the Day layer. Then use the Light Effect for the second light, and copy/paste it into the bottom layer. | |
| When the lights are as you want them, delete the Day layer by selecting the layer and clicking the garbage can icon (you can easily recreate it later) and save the BMP file. |
Step 3: Creating the Alpha Channel
 |
If you saved an alpha channel image in the first step above, load it into PSP. Copy it, then select your night texture we used above. Choose Edit/Paste as New Layer. Rename this layer Alpha Channel. If you didn't save an alpha channel, create a new layer instead as the top layer and name it Alpha Channel. Make it all white (use a white foreground color and the Flood Fill tool with a Tolerance of 200). Now lower this new layer's opacity slider to around 50% so you can see the night texture beneath. Check to see if all of the window areas are in a black area (black alpha channel) and all the landing light areas are in a white area(white alpha channel). If so, you're done editing. See Step 4 below save the files. If not, make sure the Alpha Channel layer is the current one. Then choose 0,0,0 black as foreground and background colors. Use the Preset Shapes tool (Rectangle) to drag black squares around any windows that are in white areas. They will turn black. If there are any landing lights or splashes (or ice lights, etc. - anything you want to control with the landing lights switch) that are in a black area, make the foreground and background colors 255,255,255 white. Now use the Preset Shapes tool (Rectangle) to drag across any black landing light areas. They will turn white. |
Step 4: Saving the Alpha Channel and Night Texture
| Let's save the alpha channel we just created first. Increase the opacity slider on the current Alpha Channel layer to 100%. Choose Edit/Copy and Edit/Paste as New Image. Finally choose File/Save. Change the drop down box to Windows Bitmap (BMP). Browse to your plane's texture folder and save the file as our base file name plus _L_alpha. In our case the name of the file would be dc6b_leftfwd_L_alpha.bmp. You can overwrite the original one created earlier. | |
| Now delete the Alpha Channel layer from our night texture by clicking
on the alpha channel layer (to make sure it is currently selected) and click
on the garbage can icon to delete it.
Save the resulting BMP image (it should still have the name extension _L_working.bmp). If you are warned that the image will be merged into a single layer you might not have deleted the Day and/or Alpha Channel layers, which should already be gone. Now you can produce the final nighttime aircraft texture from the image files (by combining the nighttime working and alpha textures in DXTBmp and then saving as the original night _L texture) as described earlier (Part 2, Step 2). |
Congratulations, you've completed your new paint job!