Repainting Tutorial Index
Lettering and Logos
Creating a Layered PSD
(optional)
|
Repainting Tutorial Index Lettering and Logos Creating a Layered PSD |
Now we can add the lettering and logos to the texture.
Step 1: Adding the Fuselage Lettering:
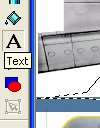 |
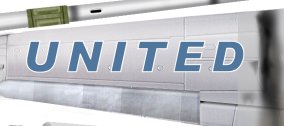
Make sure you are using your PSD file. The lettering will be added with the Text Tool (letter A icon). Choose the tool and in the Tool Options you can select the width of the Stroke of the lettering. The Stroke (the foreground color) is used as an outline around the outer edge of the letters. The Fill (the background color) is used to fill in the inside of the letter. For the fuselage lettering we have only single color lettering so this won't be used, thus set the Width to 1 or 2. We will use it later for the wings, though. |
|
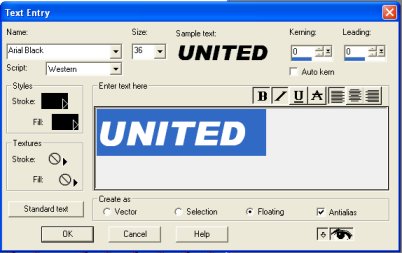
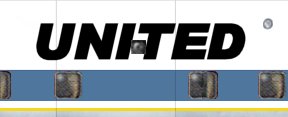
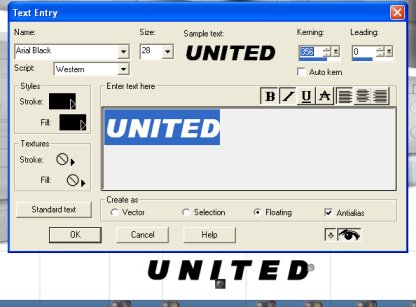
Click on the left edge of the location where the lettering will start. We'll add the large UNITED lettering in black on the fuselage. Click on the "eye" and the down arrow at the lower right. This will "proof" the lettering right onto the fuselage, so you can judge it's size and shape right on the texture (you will find these symbols on many other tools too). Select the colors for the Fill and the Stroke. I chose black for each of these (0,0,0). Check the Antialias box and the Floating radio button. Now type in the UNITED lettering in the large text box, and drag across it with your mouse to highlight it. Next, select the font you will use. I chose Arial Black. Choose Bold and Italic (B and I buttons) if necessary - I used both here. Finally, select the size of the text - I used 36 here. It looks about right on the fuselage. Click OK, and the text will be applied to the fuselage as a floating selection. Move the mouse over the lettering and drag it into final position. Choose Selections/Select None to remove the selection dotted line. |
|
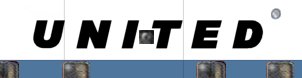
Hmm, something's not right here. The lettering covers about the right distance from end to end, but it's too big and the letters are too close together. This is the most common mistake using Windows Fonts in aircraft painting. To change this we will use kerning. Click on the Undo button and your lettering will be a floating selection again. Press the Cut button on the toolbar (scissors icon). The lettering has been removed. Let's try that again. Choose the Text Tool again (if needed) and click on the fuselage. Lower the size from 36 to 28, and increase the Kerning to around 350 (you can slide the blue bar underneath the box for rapid changes, use the up and down arrows for small changes, or just type in a new value). While the appearance of the text in the dialog box doesn't change, look at the proof lettering on the fuselage - each letter is now more spread out from the others, like in our pictures of the real thing. Adjust the font size and the kerning until the lettering is the right height, and it covers the correct distance from end to end. Click OK. Drag the lettering into final position, and choose Selections/Select None. |
 |
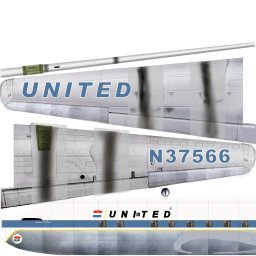
The only other lettering on this fuselage texture is the "Mainliner San Diego" lettering under the cockpit window. It's so small I did this pixel by pixel using the Paint Brush Tool with white as foreground and blue as background colors. Left click to do the writing, and right click to erase mistakes. Save your PSD file. |
Step 2: Creating the logos:
Rather than create the logo from scratch like I do here, if you have a good image or scanned picture of the logo, you can use that. Copy and paste it into a new Image, resize the image, and paste it into the texture. See how I resized the first logo I made for the second logo I needed for details.
To create the United logo that is just to the left of the UNITED lettering, we will use the Bezier Curve option of the Draw Tool to create smooth curves and the Single Line option to create any straight lines. Tool options should be Width 1, and Antialiasing checked. I'll start with the top red part of the crest. Since this is symmetric around the middle I will create half of it, and then copy, paste, and mirror the other half. The exact position is not important (we'll move it later), but the entire logo should be the same height as the lettering. Select the Draw Tool with the Bezier Curve option. Select a nice bright red for the foreground from the Basic Colors and null for the background. Draw the curve as you see it in the image.
|
|
Now use the Single Line option of the Draw Tool (no antialiasing) to draw the remainder of this half of the logo. Use the Flood Fill tool to fill the inside with red. Finally, use the Paint Brush Tool to remove any white (light) pixels next to our curved line at the top. |
|
Use the Selection Tool to draw a rectangle around the half logo. Make sure that the dotted rectangle is exactly at the right edge of the logo. Copy and paste this back into the image, and then choose Image/Mirror. Move the mirrored copy to the right edge of the original half. Finish with Selections/Select None. |
|
| Oops. I forgot that this logo is slanted. Use the Single Line option with white as the foreground color and Antialias checked. Draw a white slanted line from the top right corner down to the bottom. Now use the Paint Brush Tool to remove the little triangle that this created. To slant the left edge, do the same thing with red as the foreground color and fill in a new little red triangle with the Paint Brush Tool. | |
| Now use the same technique to add the blue lower portion. This time don't forget about the slanted lines on the side - use the Single Line option with Antialiasing checked for diagonal lines. Use the Paint Brush Tool to add the white star to the red part, and use the Selection Tool to copy and paste the logo into its final position. If this reveals some of the logo at it's original location, select a rectangle of pure white and copy/paste it over the old logo location. Use the Single Line option to create the diagonal yellow line between the logo and UNITED lettering (remember to use Antialiasing for any line that isn't horizontal or vertical). | |
We also need to create the circular logo on the nose. For this we will use the Preset Shapes Tool again, but this time set the Tool Options to Ellipse, Line Width to 1, and Antialias checked. The Width setting will be the width of the edging around the circle (foreground color) and the background color will fill the middle. Set the foreground color to yellow, and the background color to white. Starting from the upper left location of the circle, hold down the Shift key and drag down and to the right (the Shift key makes the Ellipse a perfect circle). Release the mouse button when it is the correct size. Draw a lasso around the circle using the Freehand Tool (Point to Point) and drag the circle to it's correct location. You don't have to be too careful drawing the lasso - just avoid any other part of the United paint. PSP will "shrink" the selection down to the circle when you move it (as seen in the image). Finish with Selections/Select None. |
|
|
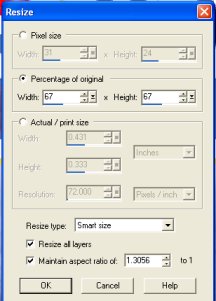
We need another logo to go inside the circle - why don't we use the one we already made? It's too big, so we will clone it and shrink it. Make the background color white (i.e. the background color of the logo). Now use the Selection tool to draw a rectangle around the existing logo. Finally, choose Edit/Copy and then Edit/Paste as New Image. We need to measure the size of the old logo vs the size needed for the new one. Choose the Selection tool and draw a rectangle from edge to edge of the logo. Don't let go of the mouse button! Read the size of the selection in the status bar at the bottom of PSP. I measure the width of the original logo as 37 pixels. Our new logo needs to be about 25 pixels (measured the same way). Thus we need to reduce the size of our copied logo by 25/37 or 67%. Make sure our logo copy is the current image by clicking it's Title Bar or select it from the Window menu. Then choose Image/Resize. Make sure that Maintain Aspect Ratio is checked. Click the Percentage of Original button and enter 67 into either box. Click OK. Our logo copy is now 25 pixels wide. Choose Edit/Copy, and then click the PSD's Title Bar to make it current instead. Choose Edit/Paste as Transparent Selection. This paste choice will not transfer any pixels of the background color, in this case white. Drag the logo onto the circle and place into it's final position. Finish with Selections/Select None. |
Finally, we have to add the UNITED lettering in this logo. It's so small I cannot use the Text Tool, so I will do it pixel by pixel using the Paint Brush Tool, with black foreground and white background. Save your PSD file. |
Step 3: Adding the Wing Lettering
|
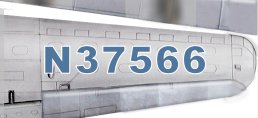
Finally we will add the lettering on the wings. Choose the Text Tool, and set Tool Options to Width 2. Click on the lower wing where the left edge of the registration number should appear. In the dialog box choose Arial Black, Size 56 (type it in), Kerning 65, Stroke white and Fill our custom blue, Bold yes but Italics no. Type in the registration number. Click OK. Drag it into proper position and click to "anchor" it. Finish with Selections/Select None (called Select None from now on). Now click where the UNITED lettering should be on the upper side of the wing. Change the settings to Italic yes, Size 64 (type it in), and Kerning 175. Type in UNITED. Click OK. Drag it into proper position and click, then Select None. |
 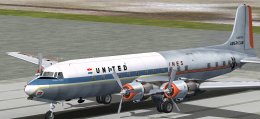 |
Save your PSD file. That's it - we're done with the daytime texture! Take a look at it on the airplane in FS to check for any final adjustments (Part 2, Step 2). Remember to choose World/Scenery Library/OK (FS2002) or Options/Display/Hardware/Global Texture Size slider (FS2004) to reload the new texture after each change. Then we can start creating the reflections. By the way, this image brings up a point I haven't covered. While I am starting with an American Airlines model that has orange paint on the nacelles, United doesn't use any paint here at all. Since there are probably other paint schemes out there that already use unpainted nacelles, the simplest way to get those for our paint scheme is to just copy the nacelle textures from the other scheme's TEXTURE folder into ours, overwriting the American originals. Same thing for other textures like still and blurred props. |
Let's move on to Part 4 - Creating Reflections